Primary Domain
If you don’t already have server space and a domain name for yourself, then go to Reclaim Hosting, sign up for a Student Account, and register a domain name. You will need to pay $30 for the the year.
Please do note that your domain name should not be tied to this particular class (we’ll get to a site for this class later, when you set up your subdomain). Check out this post on choosing a domain name before you make your final decision. You are not purchasing a web site! You are registering a domain name and server space, upon which you can build many other web sites, amongst other things.
For now, don’t load anything into your primary domain. (If you already had a site previously, it’s fine to leave whatever is there up.)
Subdomain
The subdomain you’ll create next is the main space that you’ll be using for this class. You can create as many subdomains as you would like on the server space you’ve acquired. Your class subdomain is a separate web site from anything you have on your primary domain, with its own address and its own dashboard, that will be devoted just to this course. This help document walks you through the steps for building a class subdomain. And here’s another Reclaim Hosting help document on subdomains.
Create the subdomain folder
Your domain is really akin to a folder on your computer. When I point my web browser to davidmorgen.org, it goes to that address and looks in the folder of files stored in that space, finds an index file and loads it in the browser. When I go to the site for this class, eng221f17.davidmorgen.org, the browser does the same thing — goes to that folder and looks for an index page.
So the first thing you need in order to create the class subdomain is to create a subfolder, which is the simple process of going to the Subdomains area in your cPanel and naming a subfolder. You probably want the subdomain for this class to be eng221 but you can use some other term if you prefer (note that this is just the address in the URL, not necessarily the title for your site). I am using the subdomain eng221f17 for this class because if I teach eng221 again next year, I’ll need to be able to distinguish that class site from this one. When you click on the create button after entering the subdomain name, all it does is create that subfolder on your server.
Install WordPress
The next step is to install files in that subfolder, which you do by installing WordPress. Choose the subdomain you created from the location menu.
Make certain when you install WordPress that you name your site something other than “My blog.”
Configure WordPress & Create a Menu
(Note that these instructions are copied over from last year and refer to the default theme for last year, Twenty-Sixteen, instead of the new default theme that will install for you, Twenty-Seventeen. The instructions all still apply, but the images at the bottom of this page won’t line up exactly.)
First, you need to configure your WordPress settings. In this case, I’ve got some additional directions to add though.
Create two new pages — one will be your static front page and the other will be your posts page, so for now you might call them “Home” and “Posts,” (but use other titles if you prefer.
Once you’ve created those two pages go to Customize > Static Front Page to make a static front page that displays the new home page and to designate the other as your posts page. Make sure to assign your posts page too.
Next, go to Settings > Discussion. The first box at the top of the page says “Attempt to notify any blogs linked to from the article” and by default is unchecked. Make certain to check that box. Save the changes to this page.
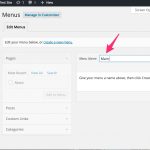 Go to Appearance > Menus and create a new menu. You can call it Main or whatever you want. Once you’ve created the menu, you need to tell the site where to display the menu, so check the location box (different themes will have different locations available. The image shows the default theme for 2016, but if you’ve changed themes you might have other options). I generally advise that when you’re starting out, you automatically add new top-level pages, which you can always turn off later if you want more manual control.
Notice in the Menu area to the left, you have a palette of items that you can add to the menu. In the default setup, you can add Pages, Posts, Custom Links, or Categories. Pages, Posts, and Categories are just those items that you’ve created in the dashboard.
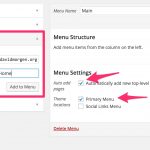 Custom Links allows you to add a link to anything on web in your menu. Add a Custom Link that connects to your primary domain by entering the address for your primary domain in the URL box and a title in the Link Text box.
Add another Custom Link, this time directed at the class page.
Save your menu.
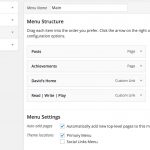 If it didn’t add automatically, make sure you add your Posts page to the menu as well. You should have a menu which looks basically like the one on the left.
Later, you can rearrange your menus however you’d like and if you’re already comfortable with WordPress and want to arrange your menus in some other style or you’ve got a theme with other menu locations, feel free to do something different. But if you’re starting out with WordPress, following these steps will help you to make your subdomain usable quickly.
One last step remains for basic setup. In the dashboard, go to Appearance > Widgets and find the widget called Meta. Click on the title, then add it to one of the widget areas on your site. This widget adds some basic links, most importantly a link to the dashboard for your site. In the future, when you’re not logged into your WordPress account, you can pull up your site and click on the login button to get to the dashboard–there is no need to go through the cPanel to get to your site’s dashboard.
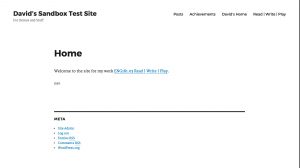
You should have a site which looks something like this now:
Eventually, I will definitely encourage you to try different themes and to customize your site. If you want to try very basic customizing of this Twenty-Sixteen theme, go to Appearance > Customize in the dashboard and try playing around with colors and/or add a header image.
